Page 1 of 3 · 10 of 26 publications

APR 21 2025

First Small Engine Repair Meetup Recap

First Small Engine Repair Meetup Recap
Resurrecting a Snow Blower, Just in Time for Easter

Just in time for Easter, a group of gearheads—and aspiring gearheads—gathered for our very first Small Engine Repair meetup with one shared mission: see if we could bring Mike T’s snow blower back from the dead. (Spoiler alert: we did!)

Starting Off

We kicked off the night with introductions and a discussion of everyone’s previous experience, as well as what they hoped to learn from the meetups. It was a great mix—some folks with deep mechanical know-how, others just starting out and eager to get their hands dirty.

We decided that a great starting point for tackling any small engine problem (especially one with a carburetor) would be learning how to clean a carburetor—a key piece of knowledge for anyone working on these kinds of machines.

Carb Talk

What followed was an open group discussion and knowledge share on carburetors—what they do, how they work, and how they fail. Ryan jumped in with some super helpful explanations, and we all gathered around the screen to watch a YouTube video that walked through the repair of the exact type of carburetor on a similar snow blower. (Link below!)

The Resurrection

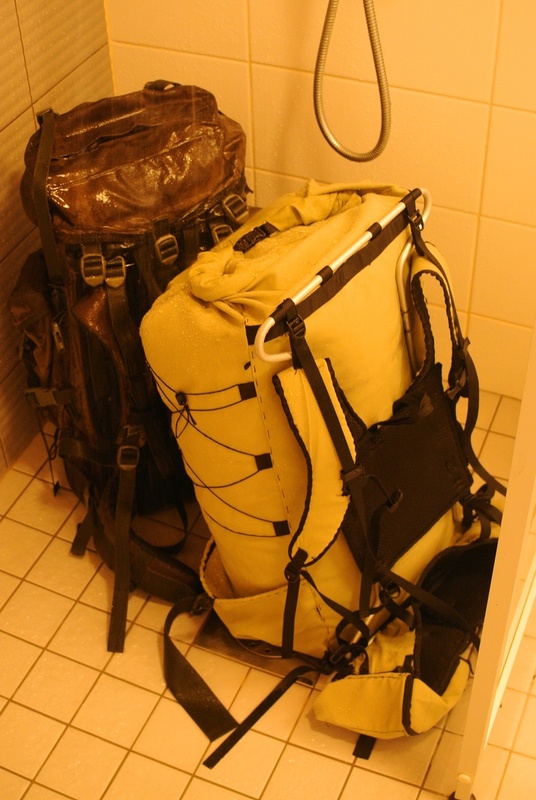
Working in Dan L’s rented space, we got our hands on the real deal. After removing all the guards and parts necessary to access the snow blower’s carburetor, we tore it down, carefully cleaned out all the orifices, and reassembled and reinstalled it. We also replaced the spark plug just to cover all our bases.

Throughout the process, we shared tips on tool usage, tricks for getting stubborn parts unstuck, and the finer points of gaskets and seals. We even had some good laughs about tool terminology—and the importance of knowing the difference between an open-end wrench and a #1 Phillips screwdriver when someone’s shouting for help. (Or you are looking for a tool yourself)

Community in Action

It was awesome to see everyone sharing their knowledge, asking questions, and learning by doing. Whether you were elbow-deep in the carburetor or just soaking in the process, there was something for everyone.

Vroom Vrrom

After just a simple cleaning and spark plug change, an Easter miracle Mike’s blower roared back to life on the third crank in fulfillment of the service manual. 

…. Actually,     it started on the first crank, but that didn’t make as good an Easter joke…..


Resources for Further study.

Want to dive deeper? Here are some of the resources we used or mentioned during the meetup:

The Planet, Dude… And Space Rules

As part of our discussion, we covered the dos and don’ts of working on engines. It is your responsibility to clean up after yourself. Extra care MUST be taken to ensure that your mess is contained, and that oils, fuels, paints, and other materials cannot possibly be released into the environment, make a mess for others, or get anywhere near a drain. YOUR EQUIPMENT IS YOUR RESPONSIBILITY.

Regarding the recycling of oil, any AutoZone or auto parts store is required to accept used oil from individuals.
AutoZone Recycling

For oil, old gas, or any other hazardous materials (such as old paint, etc.), the City of Milwaukee will accept hazmat materials from Milwaukee residents for free. Again, this is your responsibility; MMS cannot recycle these materials for you. Your machine, your mess, your cleanup.
City of Milwaukee Hazardous Waste Disposal

Lastly, space rules currently state that no car work involving fluids can be done at the space due to previous issues with people not cleaning up after themselves. Let’s continue to show that small engine owners are responsible and do not make a mess. Remember Smokey the Bear and Woodsy Owl? Treat your projects, no matter what they are, just like hiking in the woods: leave no trace when working at MMS. Dont start wild fires either.

Watch and Listen to Woodsy Owl Give a Hoot Don’t Pollute

Whats next

If you have another idea for a small engine project, please post it on the members-only message board or let Dan L know that we had so much fun with this one, let’s do other group projects in the future.


DEC 08 2024

Ongelma? Ratkaisu!

Oletko koskaan harmitellut, miten vaikeaa joidenkin asioiden säilyttäminen siististi on? Tälläkään kertaa ei ratkaista kaiken materian säilytysongelmaa, mutta Gravitrax-kuularadan osien säilyttämisen tuskaa yritetään lievittää.

Ensimmäinen versio ratapalojen säilytystelineestä oli ensimmäiseksi versioksi varsin onnistunut, sillä normaalikokoiset palat mahtuivat siihen.

Ongelmaksi muodostui sen sijaan liian suurella toleranssilla (noin 0.20 mm) tulostetut kolot, jotka eivät pidä paloja paikallaan pienimmissäkään elämän kolhuissa.

Versio kaksi ratkaisi pysymisongelman, ehkä jopa liian hyvin. Lisäksi versio kakkosen tulostaminen kesti noin 2,5 tuntia, mikä ei ole kovin kiva ominaisuus palikalle, joita tarvittaisiin noin 6 kappaletta mahdollisimman nopeasti kesken siivousta.

Versio kakkosessa kuitenkin otettiin huomioon myös mahdollisuus liittää useampi teline toisiinsa myöhemmin palapelimäisellä liitososalla. Versio kolmosta pienennettiin reilulla kädellä tulostusnopeuden parantamiseksi ja päästiin noin 1,5 tuntiin ensimmäisellä yrittämällä.

Samat liitososat sopivat tähän kuin v2. Palat pysyvät myös ylösalaisin urien pohjalla olevien nystyröiden avulla. Normaalia paksummille rataosille näitä telineitä ei ole suunniteltu ja ne mahtuvat korkeintaan etummaiseen koloon, jos edes siihen. Niitä on määrällisesti kohtuullinen lukumäärä ja niiden säilytykseen voisi putkimallinen teline sopia paremmin. Täytyy katsoa, kuinka monta iteraatiota vielä tarvitaan, mutta onneksi Tampere Hacklabilla on tarjolla laitteet, materiaalit ja osaavia kanssahakkereita, jotka opettavat tarvittaessa.

NOV 29 2024

Kontrabassoteline vanerista

Takalevyn skissi FreeCadissa.

Nurkassa on basso, joka kolisee patterinputkiin ja piilottaa kauniin etupuolen näkyvistä ja tuntuu siltä, että kaatuu ihan kohta. Tarvitaan siis teline, jolla on seuraavat vaatimukset:

Täytyy toteuttaa:

  • Ei reikiä kiinteään omaisuuteen
  • Basso ei saa kaatua robotti-imurin puuhailusta
  • Basso on helppo ottaa ja palauttaa telineeseen, myös bassoa lyhemmän henkilön toimesta

Olisi kiva toteuttaa:

  • Itse tehty, mieluusti omin ja Hacklab-välinein
  • Basson kanssa sama muotokieli
  • Näyttää basson parhaan puolen
  • Toimii vaikka basso vaihtuu isompaan
  • Parametroitu malli eri kokoisille soittimille
Suunnittelu V0

Verkkoselailun perusteella bassotelineitä on saatavilla kahden orren ratkaisuna, eli basso lepää pystyssä kahden orren päällä riittävän korkealla, jotta stakkeli ei osu maahan. Koska tehdään itse, niin pitää tehdä hienompi kuin laatikkomaiset mallit. FreeCAD:illa eka versio valmiiksi, 28mm orret pyörölistasta, etu- ja takavanerit ja väliin tukilevy reiällä, josta stakkeli menee läpi tarvittaessa. Etu- ja takalevyt tabeilla kiinni tukilevyyn.

Leikkasin ekan suunnitelman mainospahvista ja totesin, että tulee hyvin kiikkerä ja vetku teline, johon basson joutuu tähtäämään aika tarkasti.

V1

Koevedoksesta viisastuneena seuraava versio parannetuin ominaisuuksin:

  • Takalevy korkeampi, niin basson voi nostaessa viedä niin taakse, että takalevy tuntuu ja sitten laskea suoraan alas.
  • Kaikkiin levyihin R1200mm kaarevuussäde, niin saadaan tukeva ja jäykkä teline.

FreeCadin pelti-toolbox ei suostunut taittamaan valmiiksi leikattuja, kaarevareunaisia levyjä, joten täbien paikat piti laskea itse.  Tällä mennään!

Takalevyn skissi FreeCadissa.

Toteutus

1200mmx600mm 6mm koivuvaneri laseriin (power 80% speed 800), ja valmista tuli aika helposti läbiläisten avustuksella. Laseroidut reunat piti hioa, suttasivat ja tuoksuivat aika voimakkaasti. Liimaus epoksilla yksi puoli kerrallaan ja lopuksi pyörörimat. Tässä huomasin, että ihan kohdalleen ei osunut taivutuslyhentymä, eikä etenkään muoto: vaikka paikallaan olevat täbit mahtuisivat justiinsa, niin kootessa ne pyyhkäisevät leveämmän raon, eli näin sitä oppii ja onneksi vaneritäbiä on helppo pienentää.

Bassoteline liimauksessa.Liimattuna

Epoksin kanssa liimailu oli vaikeaa, kun epoksi tuntuu olevan alkuun voiteluainetta eikä liimaa.

Käyttövalmis!

Pintakäsittely puuttuu vielä, mutta muuten mielestäni teline sointuu hyvin basson ulkoasuun.

Arvostelu 4/5

Idea oli mielestäni toimiva ja toteutus ihan hyvä, mutta parannettavaakin jäi:

  • Tukilevyn reuna on leikattu kaarelle täbin ulkopuolelta myös, mutta eihän se taivu, jos ei sitä mikää kaarella pidä, eli raot jäi päihin.
  • Seuraavaan versioon täbit pidemmiksi ja kiilareiällä, niin ei tarvitse liimatessa mitään suttaavia kumilankoja ja kolhivia räikkäliinoja vaan voi kiilata liimaukseen ja katkaista sitten täbit mittaan.
  • Vaneriin jäi liekkijälkiä toisin paikoin. Väärät asetukset? Typpi avustinkaasuksi laseriin?
  • Vähän turhankin kevyt, liikahtaa helposti kun laittaa bassoa telineeseen. Kumitassut?
  • Levyjen muoto mukailee basson muotoa, mutta koska basso kapenee alapäin, ovat jalat myös kapeammalla kuin olisi mahdollista maksimileveyden puolesta. Kahteen suuntaan ei vaneri taivu näin helposti.
  • FreeCadista oli erityisen tuskaisaa saada pohjalevyn dxf ulos, aina tuli kaaret kokonaisina ympyröinä. Lopulta .step->pinta->.dxf
  • Siistintä ja pintakäsittely puuttuu vielä
  • Tästä kun saisi FreeCad-parametroidun mallin loppuun, nyt täbit skaalautuvat jo levyn paksuuden mukaan.

NOV 04 2024

HackerHighlight: De ‘vingeroperatie’ van NAO

In onze nieuwe rubriek “HackerHighlight” laten wij elke maand een project zien wat door onze leden is gemaakt. Vandaag trappen wij af met met de ‘vingeroperatie’ van de NAO in Coevorden, uitgevoerd door Sarah!

In april was ik eigenlijk op zoek naar een plek voor mijn D&D-groep en kwam zo bij de hackerspace terecht. Toen ik op een woensdagavond langskwam, raakte ik direct verknocht aan de NAO-robot. Ik kende deze robots al van mijn MBO-opleiding, waar ik een aantal jaar met hun ZORA-versie (NAO met een andere interface) heb gewerkt. Het viel mij meteen op dat één van de vingers gebroken was – een perfecte uitdaging voor mijn vriendin Marijke en mij. Marijke studeert bouwkundig tekenen en heeft de tools en skills om de vinger digitaal te reconstrueren. Zelf houd ik me graag bezig met het printproces, het materiaal, en het onderhoud van de 3D-printers. Beter kon het niet!

Zowel Marijke als ik hadden momenten waarop we met de handen in het haar zaten, vooral als er onverwachte printproblemen optraden door het weer of materiaalproblemen

Toen Marijke na vele revisies eindelijk de bestanden klaar had, begon de échte uitdaging: het printen. Tijdens het printen zijn er zo veel factoren waar je geen controle over hebt – zoals de omgevingstemperatuur, luchtvochtigheid en de staat van het filament. Het was inmiddels hartje zomer, en de omgevingstemperatuur en luchtvochtigheid waren zo hoog dat het filament zichtbaar vocht begon op te nemen. Hierdoor ontstonden er fluctuaties waarbij het materiaal afwisselend begon te krimpen en uitzetten, wat voor inconsistenties in de printkwaliteit zorgde. De eerste versies waren daarom “bijzonder”. Één origineel vingerkootje bestaat uit twee delen en een schroefje, onze versie klikte in elkaar maar door de verschillen in krimp was geen één onderdeel hetzelfde. Daarnaast moet een deel over elkaar heen glijden, wat ik met een standaard filament printer niet voor elkaar kon krijgen.

Vanaf hier is mijn avontuur met resin printen begonnen. Met dank aan Peter voor het doneren van de resin printer, ben ik zonder enige ervaring en heel veel nieuwsgierigheid begonnen met het printen van de kootjes in resin. Resin is niet iets waar je laks mee om kunt gaan maar als je er goed en veilig mee omgaat, kan je echt de meest geweldige objecten printen. Omdat resin printen nieuw voor mij was, kostte het tijd om alles goed af te stellen, maar uiteindelijk is het gelukt. Vaak kwam het neer op kleine dingen die veel impact hadden zoals hoeveel resin er in het vat zat, hoeveel UV ‘exposure’ per laag en de support die het model op zijn plaats houd. Met wat gemopper, 10 seconden lijm en flinke portie geduld, had ik nog voor de dag van de techniek de vinger klaar. Toen alles weer vast zat hebben Marijke en ik onszelf beloond met een gezellig avondje pizza en sterrenkijken.

Tot slot wil ik ook Globe in Coevorden bedanken voor hun donatie van 100 mini-veertjes en staafjes. Deze waren essentieel voor de flexibiliteit van de vinger, en maakten het project compleet. Het was een geweldig avontuur dat ik met alle kennis en tools van nu zeker opnieuw zou aangaan!”

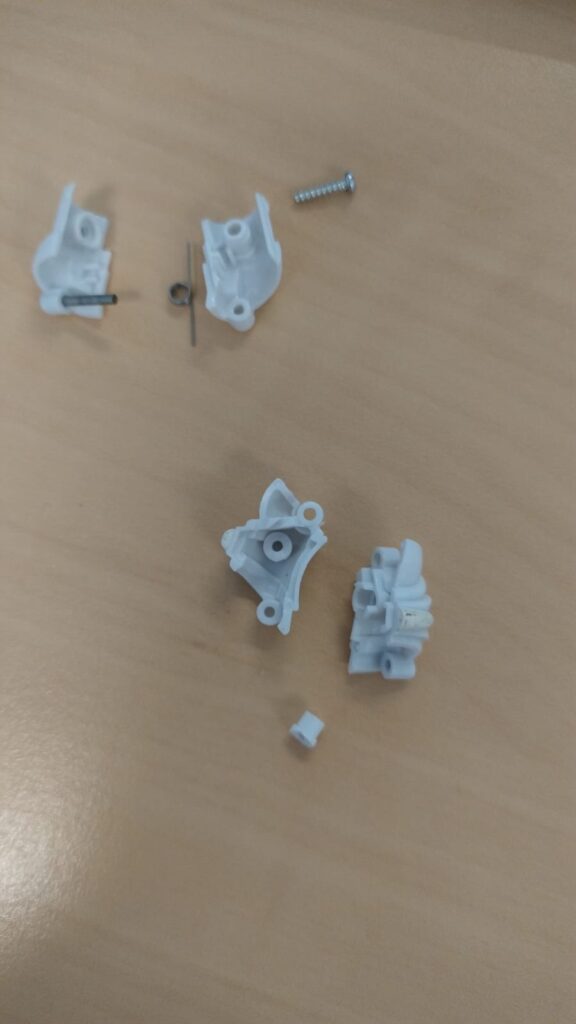
De originele vingerkootjes De eerste versie gemaakt met filament. De onderdelen paste niet goed op elkaar en de kwaliteit was niet goed vanwege oa de staat van het filament 
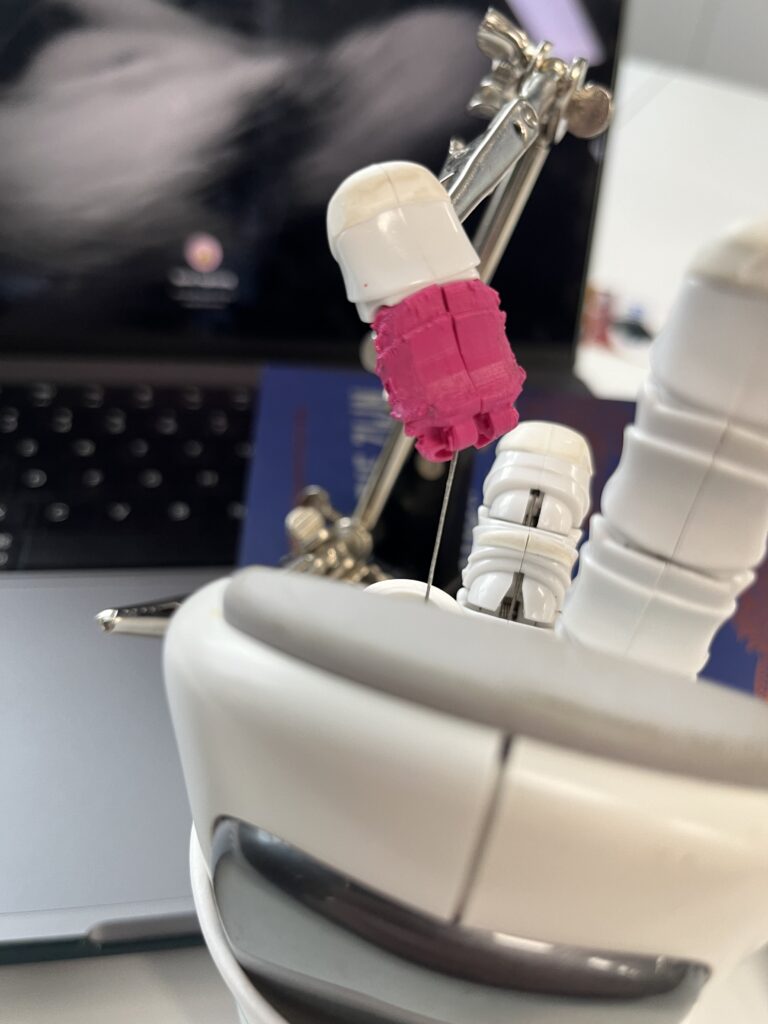
De resin versie paste gelijk en zag er ook veel beter uit
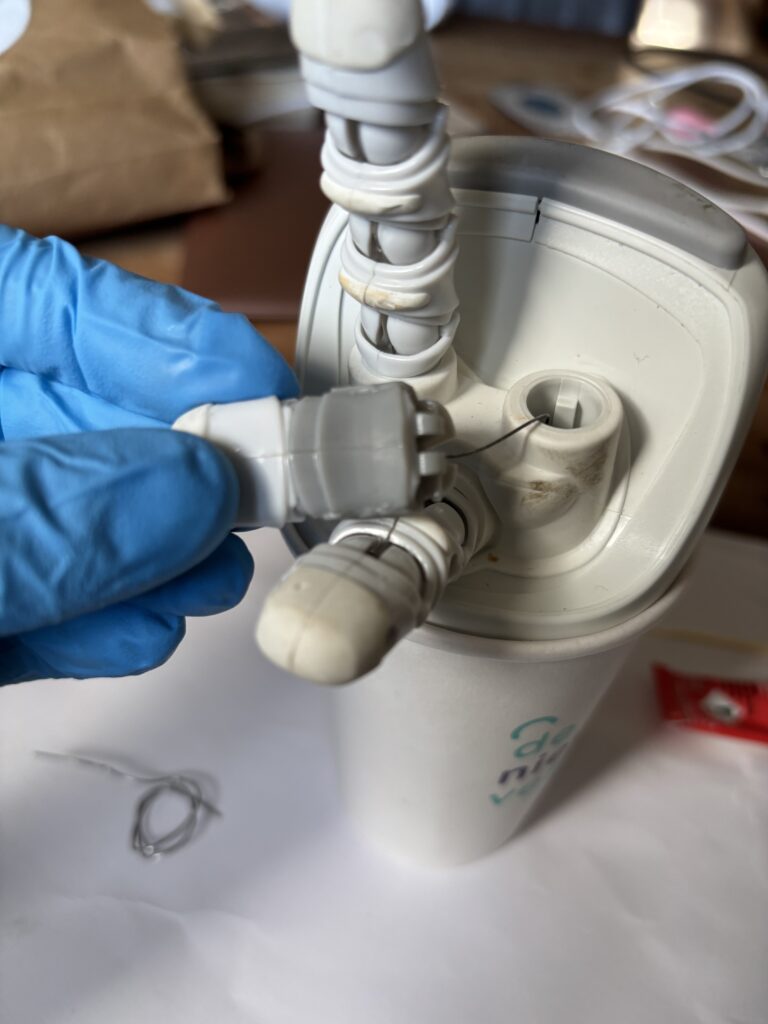
 Het eindresultaat

Heb jij na het lezen ook zin om te 3D-printen of wil je iets anders maken, bijvoorbeeld met een CNC-machine? Kom dan gerust langs op maandagavond in Emmen (Greenwise Campus) of woensdagavond in Coevorden (FabLab)

SEP 22 2024

Project: rucksack


After a couple attempts and redesigns I finally managed to finish my rucksack project this summer. I'm writing this blog post as a summary. Maybe it will be useful for other people who plan to make something similar.

Why:

A few years ago I decided to make a packrafting trip, combining hiking one way, and returning on a packraft. I didn't want to take my hiking backpack, because normal backpacks, with their many compartments and nylon fabric are not a good fit for wet environments. Having many compartments only adds weight and nylon absorbs water, adding even more weight. They also dry long, once they get wet, especially when water gets inside. For that trip I made my own drybag carrier, designed to fit Sea To Summit 65L drybag. To carry potentially wet things, like a tent, I have added to it two side bags. The overall construction worked well enough for me to finish the trip, but I wasn't satisfied. The construction was fairly heavy and the side bags were not very stable. In addition, the drybag combined two functions: water protection, and structural strength (holding items, protection from abrasion, etc.), which is not very elegant. Equipped with these lessons and dissatisfaction with the options available on the market, I started working on another backpack.

drybag carrier

Idea:

The idea was to create a non-waterproof rucksack, and use a plastic bag inside the main (and only) compartment to protect items from water. Instead of using waterproof fabric, which eventually gets wet anyway, and dries long, I wanted the backpack to just not absorb a lot of water and dry fast. Plastic bags used as liners are a standard solution, used by many hikers even if they have other layers of defense against water, like backpack covers. Having a sealed plastic bag inside has also a added benefit of making the backpack buoyant (as long as the bag stays intact...).

I wanted to have just one big compartment, plus two side pockets for water bottles and hip belt pockets/bags for snacks, camera, compass, etc. This fairly minimal construction limits amount of material used, so the rucksack is lighter and can't hold as much water. In contrast to ultra-light backpacks, I wanted mine to have a frame for added comfort. The frame also serves as an interface between the suspension system (shoulder straps, hip belt) and the bag itself. I think this modularity makes it easier to fix things, than when sewing a monolithic rucksack. Also thanks to that I could test the frame and suspension system without having a bag.

Making:

While backpack materials can be easily sourced online (shelbyoutdoor.com, extremtextil.de), sourcing the specific type of fabric I wanted turned out to be a challenge. I couldn't find a polyester fabric without any waterproof layer (they usually have a PU one). I ended up buying a fabric with polyethylene coating, and then removed the coating. I used a combination of two methods. The first involved folding the fabric in half (with polyethylene on the inside), using a modeling iron to heat the fabric so that the two layers bond, and then unfolding the fabric. This way the coating would get removed from one side of the fabric (it was hit and miss, in practice). The second method was scraping the fabric with a scraper made from a scalpel and PCL (for a handle). It worked OK, but it takes a lot of time. I think the PU coating would be even worse to remove, unless there is some way to dissolve it.

The only other notable material challenge was making a attachment bar for hip belt buckles. I tried using acrylic, but it proved too fragile. So instead I made a plate from PCL granules, and then cut it on the laser cutter. It worked very well, but the plastic needs to be soaked overnight in water with dish soap after cutting, because it stinks (there is probably some weird chemical or two produced while cutting).

I have cut the fabric and 3D mesh using the laser cutter. I have prototyped the shoulder straps and hip belt from packing paper. It makes it fast, easy and cheap to iterate, even if paper doesn't stretch, so it not a perfect model. Using laser with synthetic fabrics and 3D mesh is a good choice, because the edges are automatically protected from coming apart by melting. With 3D mesh there is  also much less mess than when cutting with scissors. Just use enough power and slow enough speed to cut it cleanly.

Due to my low skill in controlling our industrial sewing machines I have essentially sewn the rucksack by hand. In case of the bag itself, I have later reinforced the seams using machine, because it's easy to do once the fabric is already held together. There was also a lot of more tricky sewing, like sewing a binding tape on a 3D mesh, which I don't know if is even possible to do on a "normal" sewing machine.

Testing:

I tested the rucksack on a ~200 km trip from Utsjoki to Inari, through Paistunturit, a bit of Kevon luonnonpuisto, and Muotkatunturit. I slept 3 nights in a tent and 4 in huts. There was at least some rain during most days, with one of constant intense rain, one of constant mild rain, and one with multiple storms. The trip took about 7 days, and my load was ~15kg.

Results:

The bag didn't break and kept the items dry, which is a success. It was also comfortable and convenient to use, with the limited load I had.

From more negative things, the webbing had tendency to slide on the frame. This will probably be difficult to fix without changing the geometry of the frame. Another problem was that o-ring separating two parts of the frame kept moving. As a result the parts were grinding against each other, creating a lot of mess. This can be fixed by creating a plastic "coupling rod" with a ring-shaped protrusion acting as an o-ring. Not sure how well would plastic hold up in this role, though. Finding a good plastic bag isn't easy as well. The easiest option is to buy a big trash bag, which are cheap, but their quality is a lottery. Also they are usually black, which makes it challenging to find things in the bag. There are specialized Nylofume backpack liners, but their shape and size are not suitable for this rucksack.

Additional tests:

After doing the trip I made two more experiments. The goal of the first one was to measure how much water my new and old bag absorb and how quickly they dry. I showered the rucksacks for 5 minutes each, and measured their weight as they dried. Here are the results:


The second one was a quick buoyancy and swimming test. I filled the backpack with blankets and pillows (in a plastic bag, ofq), threw it into a lake, and swam around a bit using it as a flotation aid. It worked well enough, I think it would be a suitable substitute to a packraft, when crossing rivers. Since the bag can be damaged when hiking, especially in conditions like Icelandic interior (volcanic ash is abrasive and abundant), taking a second bag for crossing seems reasonable. Weight-wise it still makes sense, since even a standard trash bag weights only ~80g, while a packraft ~500g+. Here is a pic:

JAN 03 2024

Projekt: Seifenhalter

Hier zeige ich ein Beispiel, wie die digitalen Fertigungstechniken von Coredump dazu genutzt werden können, Alltagsprobleme effizient zu lösen. Zu Weihnachten erhielt ich eine Seife als Geschenk. Das Problem war, […]
DEC 26 2023

Projekt: Spulenaufbewahrung Unterfäden

Seit längerem bin ich (Jessy) auf der Suche nach einer guten Aufbewahrung für meine Nähmaschinen-Unterfäden im Nähtreff, bei dem ich mithelfe. Vorher war es ein ziemliches Chaos, bei dem man […]
OCT 01 2023

kyykkä ja koodaamisen iloa. ( Aivan turhaa?)

Tässä artikkelissa puhutaan kyykästä, koodaamisesta ja teoriasta. Teksti saattaa aiheuttaa pahoinvointia, päänsärkyä, epätoivoa ja ärsyyntymistä. Jos sinulle ilmenee näitä ilmiöitä tämän tekstin luettua, voit laittaa palautetta osoitteeseen roskaposti@roskaposti.fi. Sinua on varoitettu.

Olen harrastanut kyykkää sen 10 vuotta ja aina välillä pyöritellyt päässä eri teorioita, miten karttu etenee tai miten kyykät lentävät, kun niihin osuu. Joskus jopa kentällä keskustelu saattaa mennä erittäin teoriapohjaiseksi ja niistä kai se kipinä tähänkin on lähtenyt. Toki, suurin osasta teorioista ei ole hyötyä käytännössä, koska satunnaismuuttujien ( mitkä ei itselläni ole hallussa) vaikutus lopputulokseen on liian suuri ( kuten 4 tason häirikkö ).

Yhden keskustelun innoittamana tein aikoinaan tämmöisen kuvaajan, missä kuvataan kartun todennäköisyyttä osua kyykkään eri vaiheessa ja eri kartun etäisyydellä kyykästä. Tämä ei kovin helposti auennut ihmisille, vaikka kuinka selitti. Kuvaajassa keltainen alue on tapaukset, missä karttu ei osu kyykkään ja violetilla alueella on tapaukset, missä karttu osuu kyykkään.

Kuvaajan hyöty jäi pieneksi ja omaksi pieneksi koodaus iloksi. Toki, en itsekään löytänyt mitään sellaista tietoa tästä, mikä hyödyttäisi pelitaktisia päätöksiä. Jätin sen siihen.

Eränä pimeänä ja myrskyisenä yönä sain kuitenkin viestin kaverilta:

Jaa, joku on yrittänyt tulkita kuvaajani. Kyykkätermistö wiki: Lyöväpää kyykässä tarkoittaa, sitä osaa karttua, mikä pyörii kohti kyykkiä. Ei-lyöväpää on osuus mikä pyörii poispäin kyykistä. Olin läbillä kun sain tuon veistin ja pohdin hieman ongelmaa tussitaululla ja laitoin kaverille vastauksen:Ja

Mutta päässäolevani fysiikkamoottori oli laskenut teorian väärin:

Ajattelin, että kaverini on hieman hupsu, kun tuollaisia käppyröitä piirtelee, mutta ajattelin kuitenkin testa tuota fysiikkasimuloinnilla:

Simulointivideo

Mein Gott, hän oli oikeassa! Kuvassa siis näkyy kaksi eri karttu, jotka liikkuvat eteenpäin samalla kun ne pyörivät (vasen vastapäivään ja oikea myötäpäivään).  Kartun molempiin päihin on laitettu trackeri (seuraaja), mistä näkee kuljettu rata. Polku tosiaan on eri mitä kuvittelin.

Mutta mieleni ei antanut rauhaa ja huusi vaan ”EI RIITÄ”. Halusin tietää, kuinka paljon suuremman osan lyöväpää kattaa, kun ei-lyöväpää. Tämän on pakko olla joku helppo koodausratkaisu, mistä saan vastauksen sairaan nopee ( jä värikkään!)

Hahmottelin ideaa suihkussa hieman ja tajusin mistä aloittaa. Python, vektori, 2D-rotaatio ja hienoja plotteja!

Seuraavaksi tulee hieman toteutusta, mikä on ei teoreetikolle/koodarille tylsää, joten voi skippaa suoraan kohtaan valmiskuvaaja

if user != koodari || user != teoreetikko:
GOTO valiskuvaaja

Ensimmäiseksi loin vektorin joka symboli puolikasta karttu [0, 0.85/2]. Tämä vektori sitten pyörisi tietyllä pyörimisnopeudella ja sen nollapiste siirtyisi kappaleen liikenopeuden mukaan. Lasketaan vektorin vaiheet jokaisella aika-askeleella for-loopissa ja vola:

Ei vielä koin vakuuttava, mutta ollaan menossa jonnekin. Piti hieman parantaa koodia, muuttaa skaalausta, lisätä toinen puoli, kiroilla, käydä suihkussa ja nauhoittaa vekotorin pään etenemisen, nii saatiin jo tietää minkä alueen karttu kulkee:

Alkaa jo näyttää. Vasemmalla siis jokaisella aika-askeleella piirretty karttu-vektori ja oikealla sen peittämä alue. Seuraavaksi pitäisi jotenkin laskea sitten peittävän alueen ja ei-peittävän alueen suhde. Se ei heti auennut ja pohdin eri lähestymiä. Sektori-integrointi ois menetelmä mikä ekana tulisi mieleen, mutta aivan turhan hankala. Yksi ongelma myös oli, että kartun molemmat päät kulkevat nollan molemmilla puolilla, mikä hieman vaikeuttaa pinta-alojen laskemista, jos ei halua lähtee jakamaan pinta-aloja erikseen ( enkä halunnut ).Tutkin muita menetelmiä, miten laskea kyseinen pinta-ala. Yksi mikä tuli vastaan oli puolisuunnikassääntö (Trapezoidal rule), mutta se ei oikein miellyttänyt.
Sitten se iski, kesken saunomisen! Kiirehdin tussitaululle ja luonnostelin sen nopeasti. Kämppikset ovat jo tottuneet tähän, eivätkä reagoineet mitenkään. Jaan datajoukuon positiivisiin ja negatiivisiin joukkoihin, jolloin niitä on helpompi pyöritellä! Ja pinta-alasuhteen saadaan piirtämällä viivoja kuvaajaan ja lasken yhteen ne viivat, jotka ovat alueen sisäpuolella. Tässä kuva selvennykseksi:

"valmiskuvaaja"

Lasketaan sinisen viivan osuus kokonaispituudesta, nii saadaan tietää suhde. Erittäin helppoa! Kun tiivistää viivojen tiheyden, nii saadaan laskettua lähes täydellinen alueprosenttijakauma:

Mahtavaa! Mutta(!), nokkelimmat pokkelimmat huomasivat kuitenkin kuvaajassa jotain outoa: Se menee yli 100%. Aluksi itsekin ihmettelin, sitä ja ajattelin että koodissa on joku virhe ja pyörittelin koodia eri tavalla, kunnes katsoin alkuperäisen simulointivideon uudestaan ja tajusin: karttu käy tuon alueen läpi kahdesti! Kartun lyöväpää pyörähtää siitä läpi ensin ja tämän jälkeen ei-lyöväpää (muuttumassa just lyöväksi pääksi) pyörähtää siitä myös. Eli ei aivan turhaa koodaamista. Kaverikin tykästyi:

Noh, onko tässä sitten käytännössä mitään hyötyä?...Kuten alussa sanoin, monet muut satunnaismuuttujat hallitsevat kartun liikettä sen verran, että tämän ilmiön hyöty jää pieneksi. Tilanne missä tästä olisi hyöty, olisi silloin kun sattuu tähtäämään just tällä yli 100 % alueella ja kartun lyöväpää pomppii kyykästä yli ja ei-lyöväpää vielä pelastaa tilanteen.

Tämmöinen tällä kertaa. Kiitos ja anteeksi. Tuliko tehtyä taas turhaa töitä? Vielä kun joku tästä maksaisi :D

APR 19 2023

Olkiluoto 3 päivä

After many years of development the new unit of Olkiluoto power plant has officially started it's regular operations! Such a historical event calls for a celebration, and how to celebrate without a dedicated torttu? On the 18th of April, during the open day, there was an opportunity to try a brand new olkiluoto3torttu. The recipe is now available on our wiki, so if you want to join the celebrations, you can make your own: olkiluoto3torttu recipe. Don't worry if you feel that it's too late to celebrate - it only fits the theme of the incessant delays in the construction of the power plant!